- MetalinkWear.com
- LoneStarChemical.com
- Employment
- Contact Us
-
Knowledge Base
- Bearing, Bushing, and Seal Fits Repair
- Centrifugal Pump Coating
- Chutes and Exhauster Fan Repair
- Cobbles prevention slippage reduction
- Cooling Tower Distribution Pipe Repair
- Cracked Engine Block Repair
- Flange Repair
- Flat Back Elbow Repair
- Heat Exchanger Repair and Coating
- Keyway Repair
- MSDS
- Pipe and Leak Repair
- Process Cyclone Repair
- Pump Housing Crack Repair
- Pump Impeller Repair
- Pump Volute Repair
- River Discharge Pump Maintenance
- Scored Hydraulic Ram Repair
- Shaft Repair
- Spline Shaft Repair
- Split Case Housing Repair
- Stripped Thread Repair
- Surface Preparation for Polymer Application
- TSA Surface Preparation and Application
- Tube Sheet Repair
- Valve Seat Repair
- What is TSA?
- MSDS
Pipe and Leak Repair
Before performing a repair on pipe, line pressure must be removed. Once this has been done, the pipe length to be repaired should be blocked in, drained and the outer surface in the leak area dried. In some cases complete drainage of the pipe is not possible; a temporary measure to stop seepage must be employed. The following repair guidelines take into account different repair needs and circumstances.
LOW PRESSURE PIPE LEAK REPAIR
HIGHER PRESSURE PIPE LEAKS
Flow NOT Stopped Small Diameter Pipe
Flow NOT Stopped Larger Diameter Pipe (6" and over)
Alternate Repair for water and Steam Pipe
Pressure and Flow Stopped
1) Clean and abrade surface of pipe according to metal preparation guideline.
2) Coat entire circumference of pipe with a 1/16" to 1/8" layer of Machinable Repair™ Compound™ or Fas-Steel 4™ several inches on both sides of the leak. (Fig. 1)

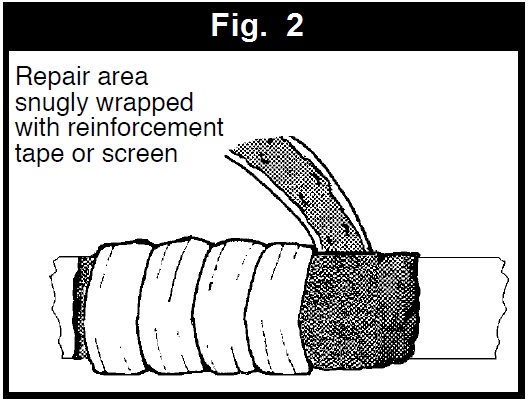
3) Wrap a layer of fiberglass cloth on top of the compound for added stability (stainless steel screen mesh cloth works well also). (Fig. 2)
4) Pull the tape snug until the compound extrudes through the tape and out and around the sides.
5) Recoat the outside of the cloth with another layer of Machinable Repair™.
6) Allow material to cure fully before returning to service.
Pressure and Flow Stopped with a Slight Drip or Trickle.
1) Clean and abrade surface of pipe according to metal preparation guideline.
2) Cut off a small piece of Metalink Steelstick™ and knead it until mixed. Wait approximately 2 - 5 minutes for material to begin to set and apply to hole or crack.
3) With the leak stopped, apply reinforcement tape Machinable Repair™ as described in above repair. (Fig. 3)

Pressure and Flow Stopped
1) Prepare a "patch" by cutting a piece of next-largest size pipe to fit over the leak area. The patch should be cut so that it will cover the fracture in the pipe at least two inches on all sides. (Fig. 4)

2) Clean and abrade surface of pipe and underside of patch in accordance with Metals Preparation Guide. Degrease with Metal Prep II™.
3) Apply Metalink Machinable Repair™ compound to the inside of the patch and outside of the pipe (1/8" to 1/4" thick). Make sure the Machinable Repair™ is forced down into the fracture in the pipe. (Fig. 5)

4) Secure the patch to the pipe with stainless steel banding or hose clamps. (Fig. 6)

5) Allow to cure fully before returning to service. For high temperature service or pressures exceeding 100 psi, extra strength is recommended for the repair. This can be accomplished in the following manner.
6) After application of the metal bands holding the patch plate in place, cut a piece of reinforcement tape so that it will wrap around the pipe at the repair area twice.
7) Coat the tape on one side with Machinable Repair™.
8) Wrap the coated tape around the repair area with the coated side against the surface.
9) Pull the tape snug until the compound extrudes through the tape and out around the sides.
10) Apply additional compound over the tape and entire repair until the area is completely covered. (Fig. 7)

11) Allow the material to fully cure before placing back into service.
Small Diameter Pipe (up to 4”, up to 100 psi)
1) Wrap the ruptured pipe with Pipe Tourniquet™, making the first wrap directly over the leak area.(Fig. 8)

2) Maintaining constant tension, continue to wrap the ruptured pipe, deviating very little to the left and right of the leak area.
3) After applying all of the Pipe Tourniquet™, maintain tension on the wrap. Fasten it in place using the Velcro strip placed at the end of the roll.
4) With the leak stopped, prepare area around the Pipe Tourniquet™ according to the Metals Preparation Guide.
5) Complete repair by applying Machinable Repair™, Fas-Steel 4™, or Seal Skin Pipe Wrap™ over the Pipe Tourniquet™. Extend compound at least 2" past the tourniquet on each side. (Fig. 9) Note: Machinable Repair™ has a slightly longer curing time, but has a higher tensile strength and works better in wet conditions.

Larger diameter pipe (6” and over)
1) Prepare a patch plate as described in Fig. 10. Now drill a 1/2” hole in the center of the patch. Complete patch preparation by welding a 1/2" forged steel pipe coupling onto the patch directly over the drilled hole. (Fig. 10)

2) Clean and abrade underside of patch according to Metals Preparation Guide. Also prepare the pipe to be repaired as best as possible, taking into account the area directly around the rupture cannot be properly prepared due to seepage.
3) Cover the entire bottom area of the patch with Fas-Steel 4™ or Machinable Repair™. Note: Machinable Repair™ has a slightly longer curing time, but has a higher tensile strength and works better in wet conditions.
4) Place the patch on the pipe so that the pipe coupling is aligned over the leak. Press firmly. Excess compound coming out from around the edges should be feathered to produce a smooth edge.
5) Add banding clamps around the patch to hold in place.(Fig. 11)

6) When the product as fully cured, simply screw a pipe plug into the coupling. (Fig. 12) Note: a piece of hose may be inserted into the coupling to provide drainage until the repair is ready to plug.

7) For extra strength, add reinforcement tape and compound as shown in Fig. 13 and the accompanying repair procedure, cutting a hole for the pipe coupling.

Alternate Repair for Water and Steam Pipe
1) Prepare surfaces according to the Metals Preparation Guide. Thoroughly clean and degrease with Metal Prep II™.
2) Remove Seal Skin Pipe Wrap™ from the protective pouch.
3) Apply Seal Skin Pipe Wrap™ by firmly wrapping the damaged area, extending 2 inches beyond repair. (Fig. 14)

4) Continue to apply pressure, molding the Seal Skin Pipe Wrap™ around the pipe by wetting and rubbing gloved hands over the surface in the direction of the wrap until it begins to set. (Fig 14)
5) If rupture in pipe is larger than 1/2", a plug will be required before wrapping the pipe. This can be done with Steelstick™ , or, if Steelstick™ is not readily available, by cutting off several inches of the Seal Skin Pipe Wrap™ and forming a plug, forcing it into the rupture. Use remaining Seal Skin Pipe Wrap™ to wrap plugged area until sufficient buildup is present.
NOTE: If pressure is not completely relieved, use the Pipe Tourniquet™, as previously described to stop water flow before applying Seal Skin Pipe Wrap™.
Pipe and elbows may be repaired, built up, and wear faced in the following manner:
1) Prepare inside of the pipe or elbow according to the Metals Preparation Guide.
2) Fill in cavitation pits, or cavities with Fas-Steel 4™ or Machinable Repair™. Note: Machinable Repair™ has a slightly longer curing time, but has a higher tensile strength and works better in wet conditions.
 3) If abrasive material flowing through the pipe or elbow is a fine particulate (1/16" or smaller), or chemical resistance only is required, coat with Brush-on Ceramic™. Simply mix the product and brush on in alternating color layers (at least two) in order to gauge wear.
4) If abrasive material is flowing through the pipe or elbow is of a larger particulate (greater than 1/16"), Metalink Ceramic Bead Polymer™ may be used. Apply material at least 1/3" thick with a trowel.
5) Be sure to feather edges at the end of the pipe or elbow to reduce turbulence and undercutting.
6) Allow to fully cure before returning to service. (See technical data.)
|
|
|
Comments
No posts found